
Roaming Setup
In order to roam, you must make a few changes before being able to successfully connect. The steps provided below should aid you in this process.
Refer to the number list for access points dedicated to your area.
Step 1.
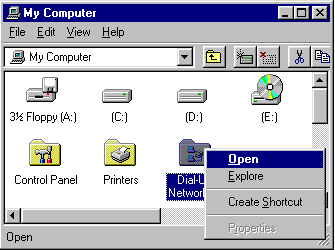
On your desktop you should see an icon that reads "My Computer", in the top left-hand corner of your screen. Click on the icon once with the right mouse button. This will give you a small drop down menu. Under this menu select "Open", by clicking on it only once, with the left mouse button.
Refer to Fig 1.1

Step 2.
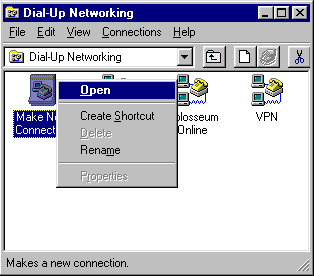
Once you have clicked on the "Open" selection, from the drop down menu, this will take you into a window, which looks similar to Fig 1.2. In that window you will see a variety of icons, one of these icons will be the "Dial-up Networking" icon. Click on the icon once with the right mouse button. This will give you a small drop down menu again. Under this menu select "Open", by clicking on it only once, with the left mouse button.
Refer to Fig 1.2
Step 3.
You should now be in the "Dial-up Networking" window, which should look somewhat similar to Fig 1.3. In this window there should be an icon that is labeled "Make New Connection". Click on the "Make New Connection" icon once with the right mouse button. This will give you a small drop down menu again. Under this menu select "Create", by clicking on it only once, with the left mouse button.
Refer to Fig 1.3
Step 4.
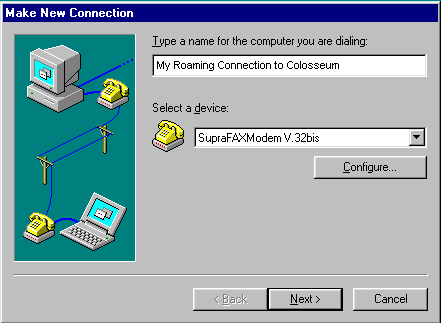
You should now be in the "Make New Connection" window. Name this connection "My Connection to Colosseum in City"(depending on the city you're in). Ensure that the modem under "Select a modem" is the correct modem you are using. Then click the "Next" button only once.
Refer to Fig 1.4
Step 5.
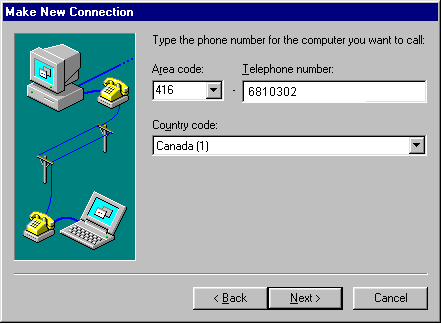
You will now have to enter in the appropriate "Area Code" and "Telephone number". Please refer to the Roaming numbers page for the corresponding area code and telephone number. Once the telephone number and area code are entered, click the "Next" button.
Refer to Fig 1.5
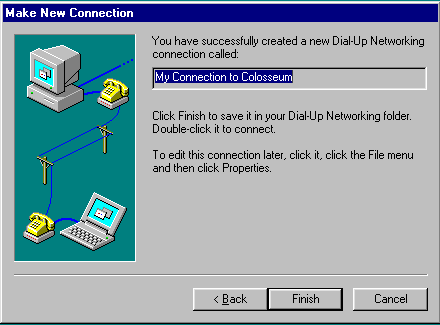
Step 6.
You have now successfully created a new dial-up connection, all that needs to be done is click the "Finish" button to confirm the dial-up profile.
Refer to Fig 1.6
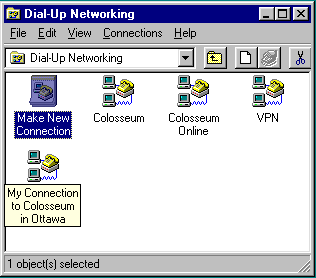
Step 7.
You should now have the connection profile in your "Dial-up Networking" window. This is the icon you should use to dial in when you are roaming.
Refer to Fig 1.7
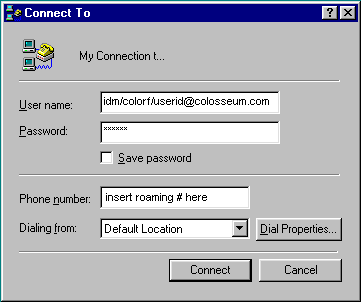
Step 8.
When you are ready to connect, you will see the "Connect To" window pop-up for confirmation, with the new number under "Phone Number". The only change you need to make here is the "User name" field.
Change it so that it reads idm/colorf/username@colosseum, instead of just "username". Ie. bill, would now read idm/colorf/bill@colosseum.com. You only need the suffix if you are roaming, not if you are local. On the first successful connection this entry will be saved.
Refer to Fig 1.8
Note: You now have multiple connect to Profiles, make sure that you are using the appropriate one for the appropriate city. If you experience difficulties making the changes please contact Support at 416.739.SURF(7873), or by email at support@colosseum.com.


